

Signing PDF files with local certificates from a web application
- Alejandro Gaio
- Oct 24, 2022
- 20 min read
Updated: Nov 16, 2022
This post describes how to digitally sign PDF files from a web page using local certificates (from the user's own computer, including hardware tokens), with the help of a small desktop module that runs in the background.
The module is a standalone Windows application that handles certificates selection from the Windows Certificates Store and signature of the files hashes sent to it.
The module is consumed by the web page using the native fetch API.
No browser plugins.
No addons.
Browser-agnostic implementation.
Table of contents
Intro
If you stumbled upon this post, chances are you were searching for a PDF digital signature approach that can be integrated into a web application and that may handle client-side certificates which aren't accessible from a backend.
If that's the case you're in luck, because here I'll explain how I implemented such a solution in a web-friendly, user transparent way... all with code included.
The solution is designed to consume client-side certificates which may also exist in the form of hardware devices (aka Digital Signature Token or USB Token).
As a final note for this intro, the code in this project targets a Windows environment, but because its based on .net core, maybe with some tweaks and fixes it may run in other platforms like Linux or Mac.
To be honest I don't know how the certificates are handled in those platforms, so drop me a message if you want to contribute with that.
You can find the source code of this post at https://github.com/alegaio7/WebPdfSigner
The dekstop application module approach
The first thing you may have found out is that interacting with local certificates from within the browser is not possible using any of the standard web APIs, so signing a PDF is unthinkable.
That being said, I developed a solution that allows a user to upload PDF files from a web page, then select a signing certificate of her own (from the Windows Certificates Store for now), sign the files, and finally download the signed PDF versions.
Since interacting with certificates is not a browser thing, we need to implement another way to handle this.
In this post I'll describe step-by-step how to complement the lack of certificate management capabilities of the browsers, and although the complete details of this implementation are somewhat extensive, the final result is a lightweight module and some web helper classes that makes signing of PDF files as transparent as possible for web users (and developers like me).
Why does this solution need a desktop application?
The browser can interact with the computer's hardware only in very specific and controlled ways: using javascript APIs.
If you need access to the file system, audio or video, there are API calls that you may call which allow doing certain things like pick a file from the user's disk, play a sound or activate the camera, but always with the user being aware of those interactions.
For instance, for a file to be selected from the local disk, the user must have clicked an input control, or if a click event was triggered in code to simulate a file selection, she must have interacted with the page first (i.e.: click/tap somewhere on the page first), otherwise the action is considered dangerous and consequently blocked.
But what if you need to perform some no standard web action, like accesing a certificate stored in a USB security token device? Good luck with that...
Certificates are handled by operating system and there's no native web standard that allows us to access them, so desktop application (module) is used to act as a middleware between the web page and the user's certificates store.
The module approach has pros and cons:
Cons:
It must be installed first, which needs Administrative privileges (only once).
The module is operating system-dependent. In this case, we are targeting Windows.
The module must be started somehow before being consumed by the web app.
Pros:
The module is browser-agnostic. Can be used with FF, Chrome, Edge, Safari, etc. since it exposes http endpoints.
Ease of use: consuming it means calling just two methods.
Since it's a desktop application, a broader O.S. access is possible if needed.
Is this approach secure?
I've seen this approach being used by financial entities like banks, when they need a logged in user to sign files or transactions.
The entity emits a certificate that the user must have installed. This certificate is used afterwars in the mentioned operations in order to validate her identity and to certify transactions.
Since the signing process must be done online, the bank's web page relies on a desktop module running in the background which stores and manages certificates issued by the entity for the logged in user.
This module uses a secure channel (https) with the web page, supported by a SSL* certificate which is installed by one of the projects.
* Since a few years the SSL protocol was being replaced by the newer TLS, but the SSL initials stuck and nowadays they're more used to denote a secure channel than referencing the Secure Sockets Layer protocol itself.
Some concepts before we start
If you don't know what a digital signature is, I recommend looking for this topic since it can get more complex as you dig it deeper.
In a very simplified way, a digital signature (DS) is a cryptographic algorithm that is used to verify some properties of a message:
Integrity: verifies that the message was not tampered with. Any attempt to modify its contents would invalidate the digital signature.
Authentication: by checking the public certificate (which can be embedded in the signature itself) used to sign the message, an individual can determine who's the author. This is over-simplified, because you have to trust not only the signer's certificate but a chain of certificates starting from the signer up to a trusted Certificate Authority (CA); or you'd have to trust the signer certificate alone if you know its origins for sure (for example, inside a company's private key infraestructure).
Depending on how the DS was implemented and its context, it can also be used for:
Non-repudiation: this means that the signer cannot claim she didn't sign the message because she's the only owner of the private key used for signing (i.e.: no other could have signed it).
In the PDF specification, a digital signature is implemented in what's called a signature container, which is a structure embedded in the file that contains all the needed information to verifify the signed contents.
The steps of the signing process
The module does only one step of the signing process, the other steps are handled by the web backend, meaning that it's not done in a single shot, but it's split in 3 parts.
But don't rush!, everything will be explained in the next sections, when we talk about signing hashes instead of files.
The challenges
There were at least 3 challenges that arised when implementing this solution:
Access and use signing certificates
Sign a batch of files instead of one by one
Http and https mixed content
Challenge #1: Access and use signing certificates.
As stated before, if a browser needs to use features that are outside the web standards, some kind of alternative mechanism must be implemented.
Those alternatives may include the use of plugins, addons (both browser-specific) or modules runing externally which communicate via http requests with the web page.
The module used in this project falls in the latter category.
You cant think of this module as a proxy that interacts between the browser and the repository where certificates are installed. In Windows, this repository is the Windows Certificates Store.
Certificates could exist as a pure digital asset (like a .pfx or .cer file imported into the store), or as a hardware device, usually called a token.
The good thing is that the certificate type used is irrelevant for the user, the browser and the helper module, since the low level implementations are managed by the operating system itself.
The helper module starts a self-hosted https server in a specific port. The browser page can then send requests to this server using the localhost:post url and it will query the installed certificates and use the one selected by the user to sign a previously uploaded PDF file.
Challenge #2: Sign a batch of files instead of one by one.
A problem when signing files in a client-server environment is the amount of data that must be transferred from one place to another.
Transferring files from the backend to the client computer for signing is a bad idea for two things:
Security: Maybe the user shouldn't have access to the file, only sign it.
Performance: Transferring a complete file may be no problem, but if there were a batch of files that need to be signed it might take a lot of time, network resources, and won't be a performant/elegant solution.
So instead of signing entire files, we will obtain hashes of them and sign those hashes.
Ok that was oversimplifying, but it gives you an idea.
What we really obtain is a hash of what's called the signed attributes of a PDF digital signature. The stage where these hashes are obtained is called "prepare the PDF files", and happens in the backend.
The signed attributes is a structure that contains the hash of the PDF contents plus some other things like revocation information, and to avoid latter confusion with the 'hash' word, there are two hashes involved when signing a file:
The first is the hash of the pdf contents, that combined with other attributes constitute the "signed attributes" structure.
The second is the hash of the whole signed attributes structure, and this is the one that gets signed by a certificate's private key.
The signature hashes obtained from the process are very little in size (~ 140 bytes) compared to the PDF file sizes themselves. This allows the process to sign hundreds of files with very little overhead.
The desktop module will digitally sign these hashes using the certificate selected by the user, and return signed hashes, which in a final process will be embedded in the prepared PDF files.
This stage of embedding the signed hashes into the prepared files also happens in the backend, and it's called "complete the PDF files' signatures".
So the steps of a typical process would be like:
The user uploads a file
The backend prepares it (get the hash) and returns a hash to the page
The page send the hash to the module
The module signs the hash
The module returns the signed hash to the backend
The backend completes the signing process by embedding the signed hash into the prepared file.
As a side note, a PDF file in the "prepared" stage has an invalid format since it's missing the signature, although it has the space reserved for it.
Challenge #3: Http and https mixed content.
Today, the majority of web pages run over a secure connection, mostly enforced by the browsers themselves.
Browsers don't allow access to http resources when running over an https connection, so mixed content is blocked.
This means that the module should be able to expose a secure endpoint that uses https.
In Windows, for a user-mode application to be able to create an https listener connection, two things must happen:
A certificate should be available in the Windows Certificates Store for use by the secure connection, and this certificate must specify key encipherment in its allowed key usages.
A port-certificate binding should be stablished with the operating system. This action binds the tcp port (in our case, we'll be using 20202) with the installed certificate.
For this challenge we will be creating two certificates:
A root one that will be used as a Certificate Authority (CA) certificate
A second certificate that will be used for the module's hosted web server when creating the https listener. This certificate will be signed by the CA's private key.
The certificates will be installed by the installer project, which needs elevated privileges, and it will also make the port binding in Windows.
Important! The only moment when elevated privileges are needed is when running the installer. The module can be run in a non-elevated user context.
Software used
The solution has 3 components:
A web application, which is what the user interacts with.
The desktop module that handles the signature-related activities.
The installer project that generates an .msi package.
We'll be using Visual Studio 2022 to build the solution which you can download from here.
The web application is a .net core 6 Razor Pages project that will serve as the frontend and backend simultaneously.
Razor Pages is a mixture (or evolultion?) of ASP.NET MVC that has added a feature from the "old" web forms: a code-behind file.
This code-behind file converts every page into its own controller, simplifiying a lot the file organization inside the project, making things a lot cleaner since you don't have to use folder name based conventions like MVC.
However, Razor Pages in fact use MVC under the hood, so you can use controllers and other MVC-related stuff with no hustle.
This project also uses the Syncfusion.PDF.Net.Core package for the "prepare the PDF files" and the "complete the PDF files' signatures" stages.
Syncfusion (SF) is a very complete solution for many kinds of projects, and it's a commercal product, however you may apply for a Community Edition license which is free.
In the project, the SF package is installed via the nuget package manager of Visual Studio.
For the desktop module, we will create a .net core 6 WinForms application, with an embedded (hosted) web server that handles browser requests.
The "WinForms" part is a standard Windows desktop application that manages user interaction with the Windows Certificate Store and also provides a UI with logging information.
The "web server" part are 2 api controllers that handle browser requests, and forwards them to the Windows form through a proxy mechanism.
The module does not require any external software to sign the hashes since it makes use of .net classes in the System.Security.Cryptography and related namespaces.
For the installer project we will be using the Wix toolset. After it's installed the Wix extension should also be added to Visual Studio.
The installer project output is an .msi package, that when executed installs the module in the user's computer along with the SSL certificates needed for secure http communication.
Finally -and optionally- OpenSSL is needed in order to recreate these certificates.
You may skip the certificates creation procedure if you want to use the ones provided with the source code.
Resuming the software used/needed:
Visual Studio 2022
.Net core 6 SDK
Latest Wix Toolset (as of october 2022 it is v3.11.2)
Wix Toolset Extension for Visual Studio 2022: installed from VS, using the Extensions->Manage extensions menu. Just type Wix and you'll find it.
Syncfusion.PDF.Net.Core (use the VS2022 Nuget package manager)
OpenSSL: only if you want to recreate the certificates.
Let's start!
Creation of certificates for Https
Tip: Feel free to skip this part if you want to use the certificates provided with the source code.
We'll need 2 certificates:
A Certificate Authority (CA) certificate
A certificate used by the hosted web server in order to stablish a secure channel. This certificate is signed by the CA certificate's private key.
The project contains a folder named "Certificates" that already has the DesktopModuleCA.cer and DesktopModule.pfx files, which are the certificates mentioned before.
There's also an additional certificate called MyTestingCert.pfx which you can use to test the PDF signing process by importing it into the Windows Certificates Store. This cert is issued to "John Doe".
There's a command script named GenerateSSL.bat that can be used to regenerate all the 3 certificates if you wanted to.
The .pfx files included in the source code are password-protected. These are the corresponding passwords:
DesktopModule.pfx: desktop
MyTestingCert.pfx: test
The CA certificate has a private key generated in binary format (DesktopModuleCA-key.pem) but it's only used for signing the second certificate. It won't be imported into the Certificates store since it will be a Trusted Root Certificate Authority.
The folder also contains other OpenSSL files needed for certificate generation:
opensslCA.cnf: used to create the CA certificate.
openssl.cnf: used to create the SSL certificate.
opensslTESTING.cnf: to create a test certificate which you may use to sign PDF files if you don't have any other of your own.
v3.ext: openssl extension used by the first 2 certificates
v3_test.ext: used when regenerating the testing certificate
When running the GenerateSSL.bat script, all the 3 certificates are created. Keep reading the following section to understand the details of this procedure or if you wish to create them manually step by step.
Warning! You may need to set full paths of the files in the GenerateSSL.bat file if you receive any errors stating that OpenSSL is unable to find them.
The CA Certificate
To create the CA certificate, open a command prompt in the certificates folder of the project and type the following command to create an RSA key pair of 2048 bits length:
openssl genrsa 2048 > DesktopModuleCA-key.pemThen type the following to create a CA certificate, using the key created before:
openssl req -new -x509 -nodes -days 10950 -key DesktopModuleCA-key.pem -out DesktopModuleCA.pem -config opensslCA.cnfFrom the DesktopModuleCA.pem file (the CA certificate), we'll create a certificate with the .cer extension:
openssl x509 -outform der -in DesktopModuleCA.pem -out DesktopModuleCA.cerNote: When creating the DesktopModuleCA.pem, a password is requested, but this specific password is not needed for the rest of the procedure. Other passwords asked by openSSL are needed, and you'll be notified in the proper step when to take note and use them.
The SSL Certificate
We'll now create the SSL certificate using the CA private key to sign it.
In the command prompt type the following command. After hitting ENTER, openSSL will ask you a passphrase for the .pem file and a confirmation. Take note of it! You'll need it later. This creates the certificate request, not the certificate itself:
openssl req -new -out DesktopModule.req -keyout DesktopModule-key.pem -newkey rsa:2048 -sha512 -config openssl.cnfNow, create the certificate from the request:
openssl x509 -req -in DesktopModule.req -CAkey DesktopModuleCA-key.pem -CA DesktopModuleCA.pem -days 3650 -sha512 -out DesktopModule.cer -set_serial 12345678 -extfile v3.extNext, we need to convert the certificate and private key into a pfx format suitable for importing into the Windows Certificates Store.
After hitting ENTER, openSSL will ask you for the PEM passphare that you took note earlier, and to enter a password and a confirmation for the pfx, so there's a total of 3 password to type in. Take note of the .pfx password, you'll need it later too!
openssl pkcs12 -inkey DesktopModule-key.pem -in DesktopModule.cer -export -out DesktopModule.pfxThese certificates aren't used by the desktop module directly. In fact, they're not referenced in code at all, however they are installed by the installer project in the Windows Certificates Store of the target computer.
When the desktop module runs and creates the web server, the port used for https should be already bound to the certificate by the installer, and that's all we need to open an https listener socket.
A final note when recreating the certificates
If you choose to recreate the certificates, you must edit the file Product.wsx in the DesktopModule Installer project.
Change the parts in red only if setting a different password for the DesktopModule.pfx file:
<Directory Id="DirectoryCertificates" Name="Certificates">
  <Component Id="DesktopModuleCA.cer" Guid="*">
    <File Id="DesktopModuleCA.cer" Name="CA.cer" Source="..\Certificates\DesktopModuleCA.cer" />
      <iis:Certificate Id="Certificate.CA" Name="DesktopModuleCA.cer" Request="no" StoreLocation="localMachine" StoreName="root" Overwrite="yes" BinaryKey="Certificate.CA.Binary" />
  </Component>
  <Component Id="DesktopModule.pfx" Guid="*">
    <File Id="DesktopModule.pfx" Name="DesktopModule.pfx" Source="..\Certificates\DesktopModule.pfx" />
      <iis:Certificate Id="Certificate.DesktopModule" Name="DesktopModule.pfx" Request="no" StoreLocation="localMachine" StoreName="personal" Overwrite="yes" BinaryKey="Certificate.DesktopModule.Binary" PFXPassword="desktop" />
  </Component>
</Directory>
Then change the following value always if the certificate was recreated:
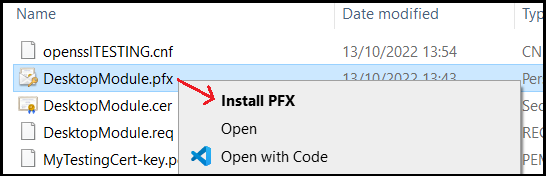
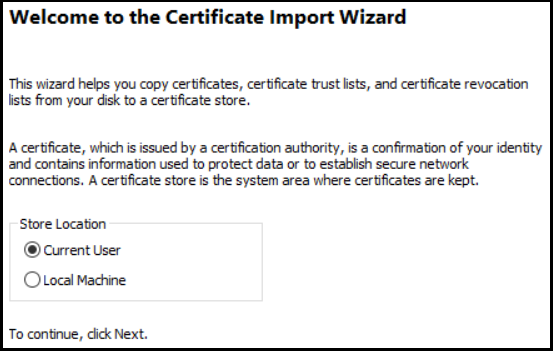
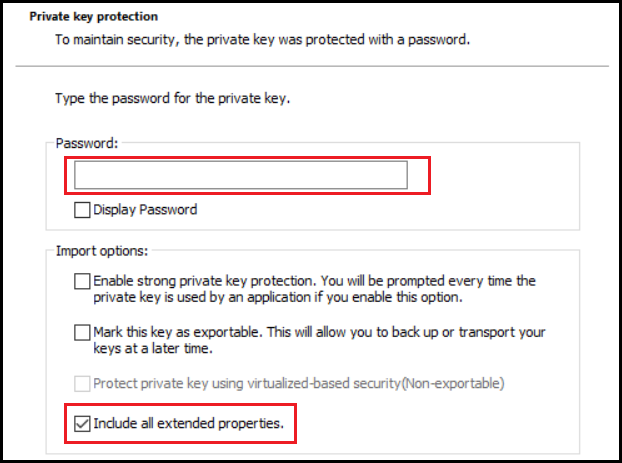
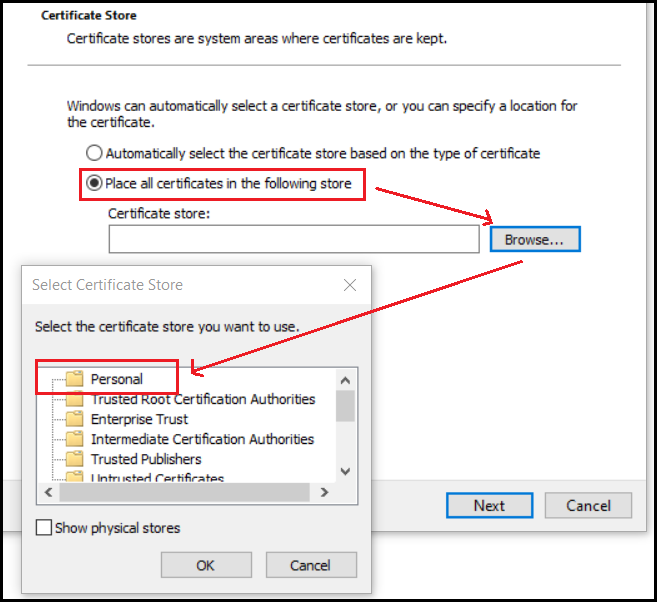
<CustomAction Id="AddSSLCert" Directory="INSTALLDIR" ExeCommand="[SystemFolder]netsh.exe http add sslcert ipport=0.0.0.0:20202 certhash=7952706a9e878d54c0ba871e8019b0b117900e12 appid={214124cd-d05b-4309-9af9-9caa44b2b74a}" Return="ignore" Impersonate="no" Execute="deferred" />Obtaining the certificate hash (or as Windows call it, the thumbprint) is a little bit tricky. You have to import it first into the Windows Certificate Store.
Go to the Certificates folder, right-click on the .pfx file, and select Install PFX from the context menu:
Select current user as the Store location:
Enter the .pfx password and check the Include all extended properties box:
Next select Place all certificates in the following store, press Browse and select the Personal store:
You should see a message stating that the certificate was successfully installed.
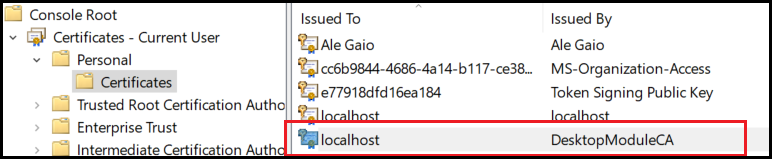
Then select Run from the Windows start menu, and enter mmc. Select the File -> Add/Remove snap in menu and pick the Certificates snap in from the list. Select My user account when asked.
After adding the snap in to the console, expand the tree on the left to this branch:
Console Root -> Certificates -> Current user -> Personal -> Certificates
Locate in the list of certificates the one you just installed:
Proceed to double-click it. A new window appears. Select the Details tab, scroll all the way down and click on the Thumbprint field. Then select all the text in the window below and copy it.
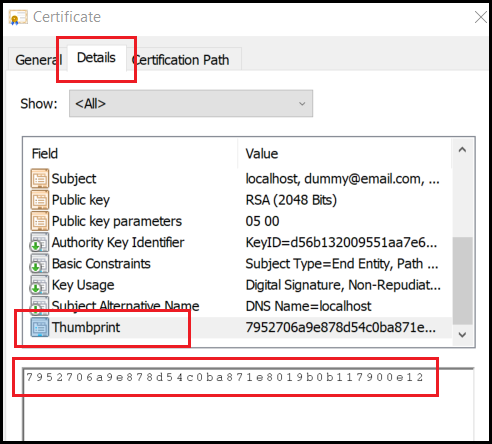
Finally, paste the copied thumbprint in appropriate section of the Product.wsx file mentioned earlier.
After the thumbprint was copied, close the Certificate window, then select the certificate from the right pane of the mmc console and delete it.
Let's go with the code!
The code part will be divided in 3 sections:
The desktop module
The web project for selecting/uploading PDF files and trigger the sign process
The Wix installer project
1. The desktop module
The desktop module is a .net core WinForms project, but with some tweaks.
To begin with, it references the Microsoft.NET.Sdk.Web instead of Microsoft.NET.Sdk, in order to use the web hosting components.
The project also defines a Controllers folder, typical of WebApi and MVC solutions but not for WinForms. This is because the form will host a web server that has a couple of controllers.
Once launched, the form creates this web server using Microsoft.Extensions.Hosting.Host.CreateDefaultBuilder. The relevant code is in the ConfigureWebServer method, which in turn uses the Startup class -very common approach in .net web projects- to set up these:
Controllers
Routing
Cors: Needed to allow cross origin calls between the web page and the desktop module, since both live in different domains.
The module doen't need to be configured for authorization or authentication. All methods can be accessed anonymously since the requests will come from the same computer.
As part of creating the web server, a helper class called WebRequestCoordinator is instantiated and registered as a singleton with the DI container.
This class is a proxy between the windows form and the web api controllers. It exposes methods that are called by controllers and in response it raises events, which are handled by that form.
The results of the form operations are returned in event arguments, which are then used by the controllers to build a web response (usually, an IActionResult).
In order to put some flavour to the words, I made the following diagram that shows the information flow when the web page makes a request to the destop module:
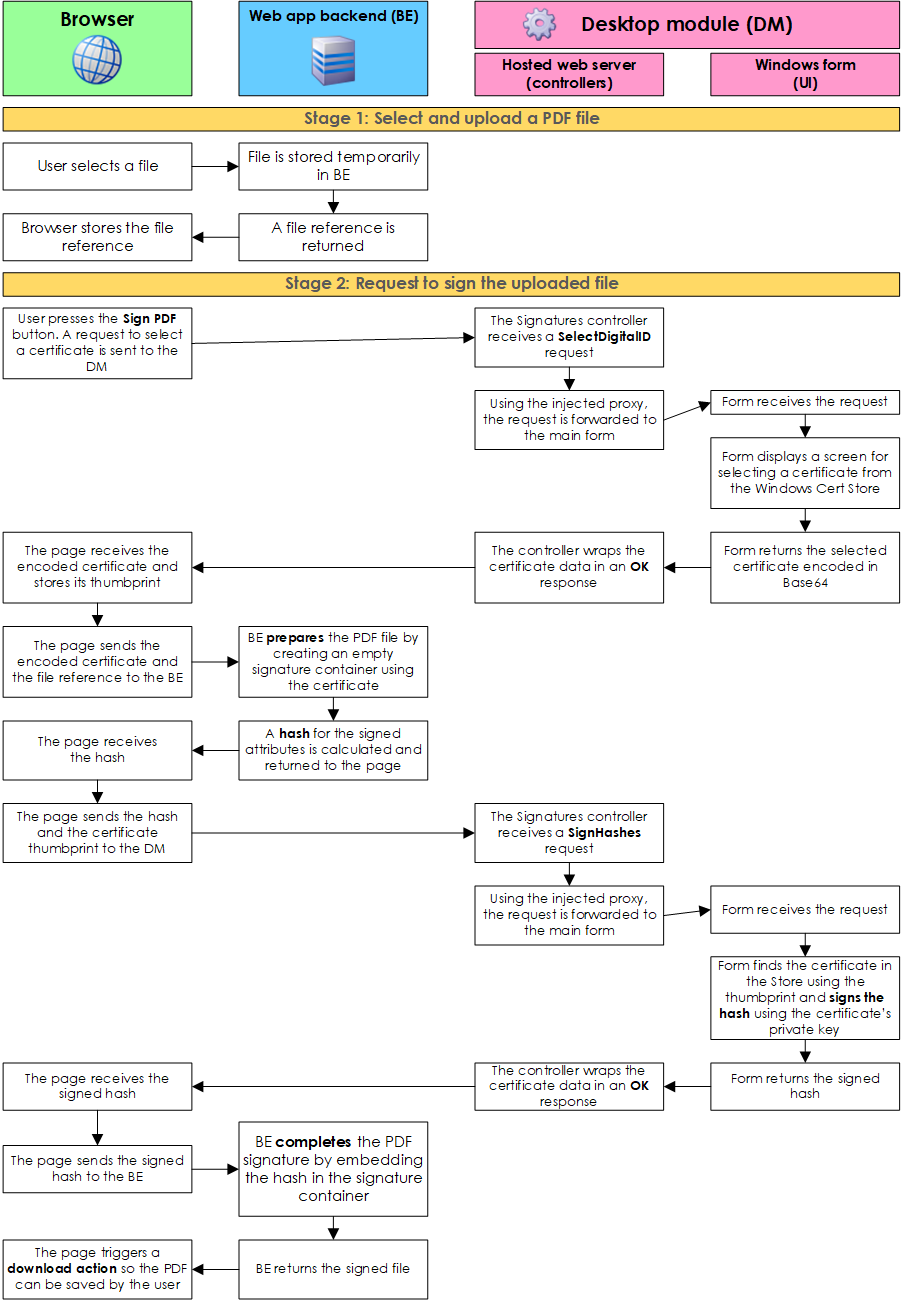
The process explained
As shown in the image, signing a PDF file takes several steps, which may seem complex at first, but I'll try to break down the process:
The user uploads a file from the web page. The file is stored in the backend (BE) and a reference is returned and kept by the browser. Think of this reference of something like a uuid.
The user presses the "Sign file" button in the web page, which sends a request but this time to the desktop module (DM). This causes the DM to show a window so the user can pick a certificate from the Windows Certificates Store. Requests to the DM are sent using the javascript fetch api to the https://localhost:20202/ url.
The user selects one certificate for signing.
The selected certificate is encoded in base64 by the DM and returned to the web page as a json response.
The web page makes another request, now to the backend, along with the encoded certificate in order to prepare the uploaded PDF file. As a side note, the encoded information is the certificate and public key, not its private key. The private key is never transmitted to the web application whatsoever.
The result of this preparation is a file with an empty digital signature container, and at the same time a hash of the signed attributes is obtained.
The file hash is returned from the backend to the web page (we have now 2 files, the original, and the "prepared").
The web page sends the hash and the certificate thumbprint to the desktop module. The thumbprint is used to find the certificate in the Windows Certs Store and since it has just a few bytes long, we avoid passing the complete certificate back and forth between components.
The DM accesses the certificate and uses its private key to sign the received hash.
The module returns the signed hash to the web page.
The web page passes this signed hash to the backend in order to complete the prepared file.
The backend completes the file signature by embedding the signed hash into the prepared file.
The BE returns the signed PDF file to the web page as a blob response.
The web page triggers a "download file" action with the signed PDF.
The user gets the signed file.
The SignHelper class
Whenever a request to sign a PDF comes in and goes through all the components in the desktop module's pipeline, it finally arrives at the core component responsible for doing the cryptographic operation: the SignHelper class.
This class is quite simple, it has a single method that receives a byte array and an instance of a X509Certificate2 class (that is the original certificate selected by the user), and performs the hash signing.
The single method is called SignData and this is the code:
public class SignHelper
{
  public byte[] SignData(byte[] hash, X509Certificate2 cert)
  {
    var ka = cert.GetKeyAlgorithm();
    if (ka == "RSA" || ka == "1.2.840.113549.1.1.1")
    {
      using (var rsa = cert.GetRSAPrivateKey())
      {
        return rsa.SignData(hash, HashAlgorithmName.SHA256, RSASignaturePadding.Pkcs1);
      }
    }
    else if (ka == "1.2.840.10045.2.1")
    {
      using (var ec = cert.GetECDsaPrivateKey())
      {
        return ec.SignData(hash, HashAlgorithmName.SHA256, System.Security.Cryptography.DSASignatureFormat.Rfc3279DerSequence);
      }
    }
    else
      throw new Exception("Unsupported key algorithm.");
  }
}
2. The web project
As seen though this post, the signing process flow is:
Prepare file -> Sign hash -> Complete the signature
The desktop module does the sign hash part, and the web project does the prepare and complete parts.
Although the web project is part of the whole solution, the idea is that you can grab the functional bits of it and incorporate them into your own projects.
The main components of the web application are:
The index page: which allows the user to select and upload a PDF file, and start the sign process using a button.
The index code-behind: which acts as a controller for the page. It's responsible of storing the file in the backend, and when the user starts the signing process, it's responsible of preparing and completing the signatures using a helper class.
The SignEmpty and ExternalSigner classes, which carry on the prepare and complete stages of the signing process respectively.
The SignaturesHelper class which does the core cryptographic operations, and is called by the index controller.
The SignatureHelper class
This class is by far the most complex from all the project.
The PrepareFileForLocalSigning method is large and complex because it has to do several things, like:
Obtaining the PDF form from the file.
Checking if there's rotation involved.
Rotate the signature text or image (if provided), according to the document rotation.
Translate screen coordinates used to specify the signature box location, to pdf coordinates, which use another density of dots per inch and another coordinates system.
Calculate the size of the signature box, and split it in half if image and text are added to the signature. The current version of this project only uses text, but maybe in the future I'll add documentation about using images too. The SignatureHelper class is ready to deal with images.
Prepare the pdf file with and empty signature container, using the SignEmpty class.
The CompleteLocalSigning method is simpler, because all the hard work was done by PrepareFileForLocalSigning. CompleteLocalSigning uses the ExternalSigner class to embed the signed hash into the empty signature container prepared in the first stage.
SignEmpty is a dummy implementation of an interface needed by the SF package, which receives a byte array and instead of signing it, returns null. This creates an empty signature container in the prepared file.
ExternalSigner is a class with the same interface implementation as SignEmpty, but instead of returning null -or even signing anything- just returns the same array of bytes (which is indeed the signed hash) and stamps it into the file.
3. The installer project
The last of the projects is the installer project, which doesn't show any configurable options to the user besides selecting the target installation folder.
The output of this project is an .msi package which does the following:
Installs the desktop module files in the user selected folder.
Installs the CA and SSL certificates in the Windows Certificates Store.
Binds the port 20202 that will be used for https to the certificate.
Configures the module to auto-start right after the user logs in Windows.
There are 3 main parts of this project are:
The Certificate files: referenced in Certificates.wxs.
The Module files: referenced in ModuleFiles.wxs.
The main installer references and configuration: Product.wsx.
Running the solution
Follow these steps to run the solution and sign a PDF file:
Download and build
Download or clone the repository.
Open the solution in Visual Studio. Check the necessary packages are installed or download them, as described earlier in this post.
Make sure the solution is in Release mode.
Build the solution.
Install
Find the .msi installer created after build under the DesktopModule Installer/bin folder/[your language]/Desktop Module Setup.msi and run it.
After it has finished installing the Desktop Module is launched automatically.
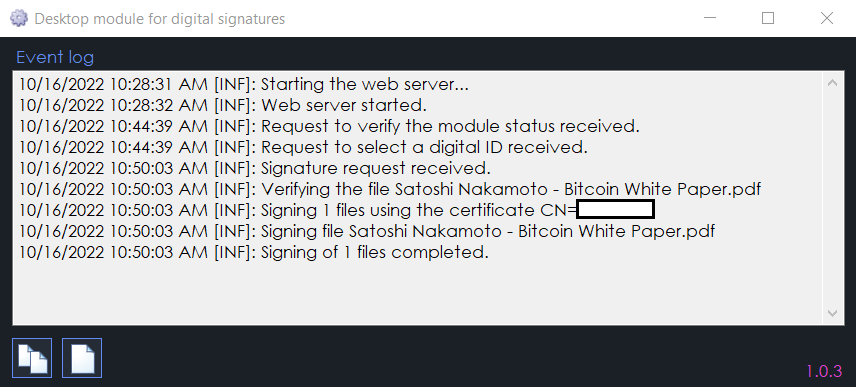
The module has a very simple UI. Basically, an event log window which you may copy contents from, and clear:

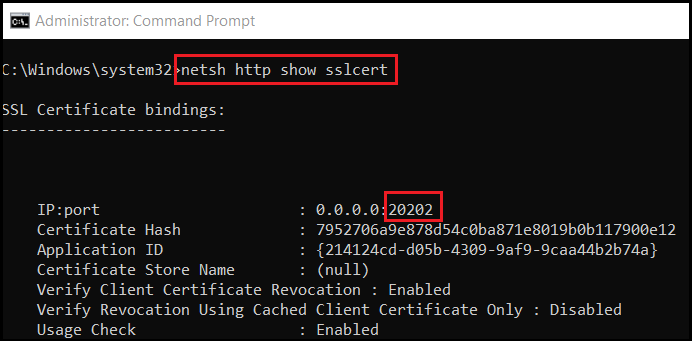
Tip: If you want to check the certificate bound to the port, open an elevated command window and type the command as shown in the following image:
From Visual Studio, launch the web application:
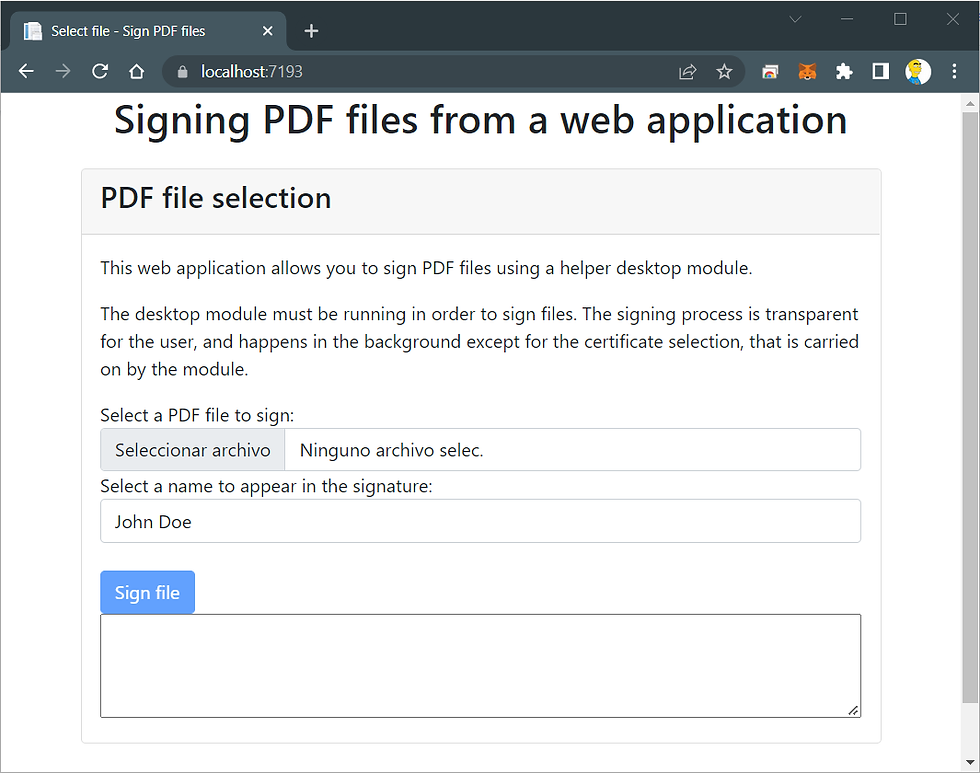
Select a PDF file and upload it to the application. Then press the Sign file button.
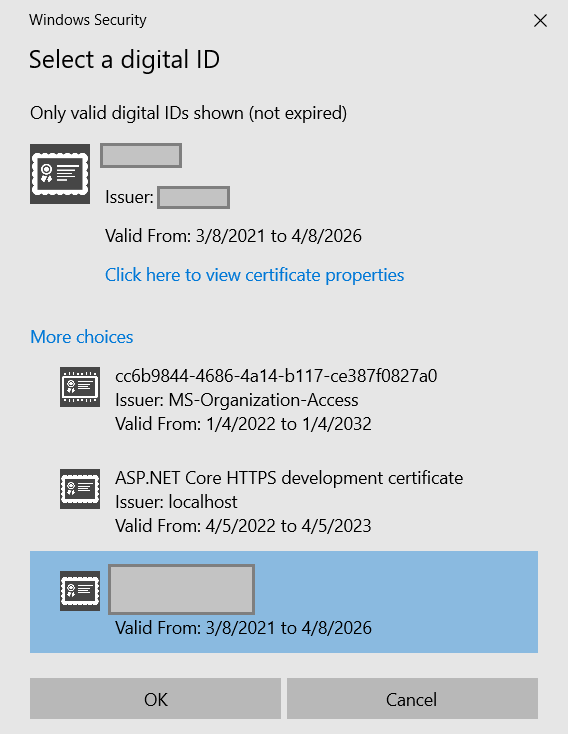
The web page makes a request to the desktop module so the user can select a certificate form the Windows Certificates Store. Select one suitable for signing files:
After the certificate is selected, the signing process starts, and the module will show some events:
And so it does the web application:
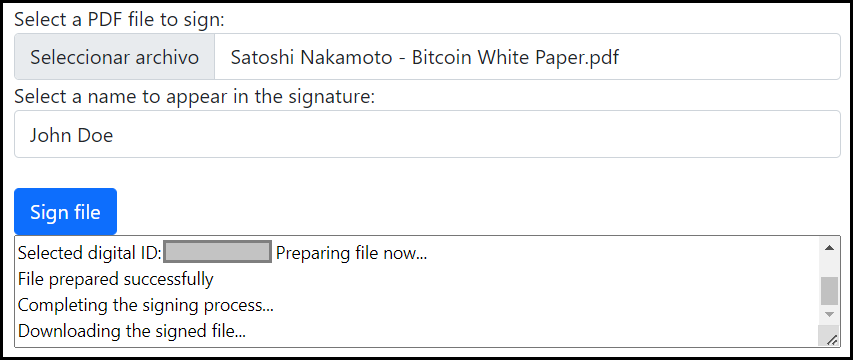
After the process completes, the file is sent to the user for download.
Bonus
In the Certificates folder there's a file called MyTestingCert.pfx which is a certificate you can use for testing.
Just import it into Windows -> Certificates (Current user) -> Personal store, with the password "test".
It was a long post, but we reached the end, finally!
I hope you can run the solution and find something that is useful for your projects.
Please drop me a comment if you have doubts or encounter any problems.
Good luck!
Comments